Save
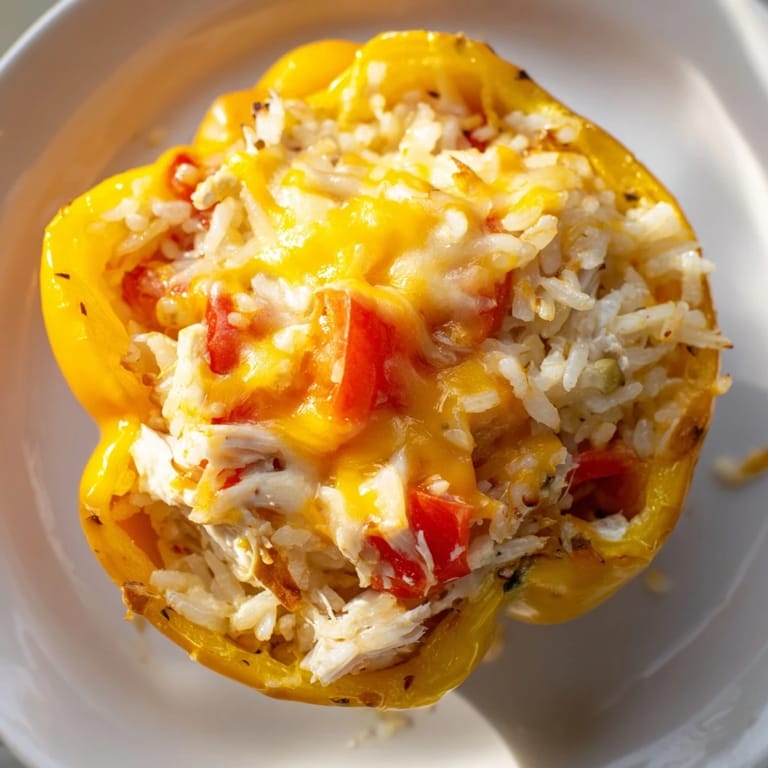
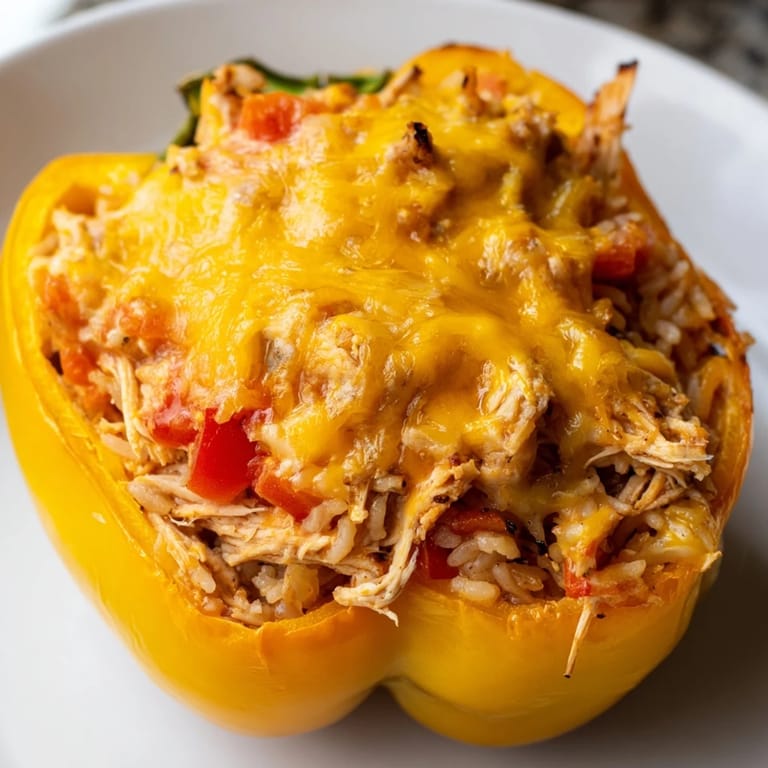
Save There's something magical about pulling a baking dish out of the oven where bell peppers have transformed into little edible bowls, their skins softened and their insides bursting with savory chicken and melted cheese. I discovered this recipe on a random Tuesday when I had half a rotisserie chicken left over and a fridge full of bell peppers from the farmers market. My kids actually asked for seconds, which rarely happens with anything green on their plate. What started as a way to use up ingredients became the dinner I now make at least twice a month.
I made these for my sister's family one Saturday, and her five-year-old actually ate the entire pepper without complaint—something I'd never seen happen before. My brother-in-law asked for the recipe, which felt like the highest compliment. It's become our go-to potluck dish because it travels well and tastes just as good the next day.
Ingredients
- Bell peppers (4 large, any color): Look for peppers with flat bottoms so they sit upright without rolling; red and yellow ones are naturally sweeter, which balances the savory filling beautifully.
- Onion (1 small, finely chopped): The base of every good filling—sauté it until it's soft and just starting to turn golden, and the whole dish tastes more developed.
- Garlic (2 cloves, minced): Don't skip this step or pre-mince it hours ahead; fresh garlic added right before the chicken makes a noticeable difference.
- Cooked chicken (2 cups, shredded): Rotisserie chicken is a time-saver and honestly adds more flavor than boiled chicken; if using leftovers, warm them slightly so they blend smoothly into the filling.
- Cooked rice (1 cup): Use whatever you have on hand—white, brown, or even minute rice works fine and stretches the filling without diluting the flavor.
- Cheddar cheese, shredded (1 1/2 cups, divided): Buy a block and shred it yourself if you can; it melts smoother than pre-shredded, which often contains anti-caking agents.
- Cream cheese (1/4 cup, softened): This is the secret ingredient that makes the filling creamy without needing added cream or milk; let it sit out for 10 minutes before mixing.
- Diced tomatoes (1 can, 14 oz, drained): Drain them well or the filling becomes watery; if you have fresh tomatoes, chop and use those instead.
- Italian herbs (1 teaspoon dried): Fresh herbs are wonderful if you have them, but dried works reliably; basil and oregano are the backbone here.
- Smoked paprika (1/2 teaspoon): This adds depth and a subtle smokiness that regular paprika can't match—worth keeping on hand.
- Salt and black pepper (1/2 teaspoon and 1/4 teaspoon): Taste as you go; the cheese and tomatoes already add saltiness, so be gentle.
- Olive oil (2 tablespoons): Just enough to sauté the aromatics without making the filling greasy.
Tired of Takeout? 🥡
Get 10 meals you can make faster than delivery arrives. Seriously.
One email. No spam. Unsubscribe anytime.
Instructions
- Heat the oven and prep the stage:
- Set your oven to 375°F and lightly oil a baking dish large enough to hold all four peppers standing upright; this matters more than it sounds, because peppers that tip over spill their filling as they cook.
- Sauté the aromatics:
- In a skillet over medium heat, warm the olive oil and add your chopped onion, cooking for about two to three minutes until it's translucent and soft. Add the minced garlic and cook for just thirty seconds more—any longer and it burns, which tastes bitter.
- Build the filling:
- In a large bowl, combine the shredded chicken, cooked rice, sautéed onion and garlic, drained tomatoes, one cup of the cheddar cheese, softened cream cheese, Italian herbs, smoked paprika, salt, and pepper. Mix everything gently until the filling is evenly distributed; you want the cream cheese to soften and bind everything without overworking it.
- Stuff the peppers:
- Spoon the filling into each hollowed pepper, packing it in gently but firmly so it doesn't sink as it cooks. Stand them upright in your prepared baking dish, nestling them close enough that they support each other but not so tight they touch.
- Top and add steam:
- Sprinkle the remaining cheese over each pepper's opening, then pour two to three tablespoons of water around the base of the peppers; this creates steam that softens the pepper skin without drying out the filling.
- Bake covered, then uncover:
- Loosely cover the dish with foil and bake for twenty-five minutes, which steams the peppers tender while keeping the cheese from browning too fast. Remove the foil and bake for another ten minutes until the cheese is golden and bubbly and the pepper skin looks slightly wrinkled.
- Rest and serve:
- Let the peppers cool for five minutes—they're hot enough to burn your mouth fresh from the oven, and this resting time lets everything set slightly so the filling stays inside the pepper.
 Save
Save One evening, I made these peppers while my partner chopped vegetables beside me, and we got to talking about what we wanted to do differently next year. Nothing fancy happened, but somehow that ordinary conversation felt like the whole reason the dinner existed—the food was just the framework for being together in the kitchen. That's when recipes stop being about instructions and start being about ritual.
Why This Dish Works as Comfort Food
There's something deeply satisfying about a meal where every component plays a role—the rice soaks up flavors, the cheese creates creaminess, the chicken provides protein, and the pepper itself becomes the vessel and the vegetable all at once. When everything is cooked together, the flavors meld in a way that tastes more refined than the sum of its parts, which is exactly what comfort food should do. It's the kind of dish that feels indulgent but isn't—you finish eating and feel nourished rather than heavy.
Customizing Your Peppers
The beauty of this recipe is that it adapts to whatever you have and whatever you're craving that night. I've made it with ground turkey instead of chicken when that's what was on sale, swapped the rice for cauliflower rice when I wanted it lighter, and added spinach or corn when I wanted more vegetables without changing the structure of the dish. The filling is forgiving enough that small substitutions actually improve it rather than break it.
Making Ahead and Storing
These peppers are one of my favorite make-ahead dinners because you can assemble them completely the night before and just bake them when you're ready to eat. The filling also keeps in the fridge for up to three days, so you could stuff peppers on Sunday and bake them throughout the week—just add an extra five minutes to the bake time if they come straight from the refrigerator. Leftovers reheat beautifully in a low oven or even in the microwave, though the microwave makes the cheese texture less perfect.
- Freeze unbaked stuffed peppers for up to three months; bake from frozen, adding about fifteen extra minutes to the cooking time.
- Store leftovers in an airtight container for up to four days, though they taste best within two days.
- If you're doubling this recipe for a crowd, you'll need a larger baking dish or two standard ones, and the baking time stays the same.
 Save
Save These peppers remind me that the best dinners aren't the ones that look like a magazine photograph—they're the ones that bring people to the table and make them feel looked after. Make this recipe exactly as written the first time, then make it your own every time after that.
Recipe FAQs
- → Can I use a different protein instead of chicken?
Yes, cooked turkey, ground beef, or plant-based alternatives work well as substitutions, adjusting cooking times accordingly.
- → What can I use instead of rice in the filling?
Quinoa, cauliflower rice, or even cooked couscous are great low-carb or texture variations for the filling.
- → How do I ensure the peppers cook evenly?
Use uniform-sized bell peppers and bake them upright in a greased dish. Adding water to the dish helps steam and soften them evenly.
- → Can these stuffed peppers be prepared ahead of time?
Absolutely. Prepare the filling and stuff peppers in advance, then bake just before serving for fresh, hot results.
- → How can I add more vegetables to this dish?
Incorporate finely chopped spinach, corn, or diced zucchini into the filling for added texture and nutrition.