 Save
Save Sunday mornings at my aunt's house meant waking up to the smell of something warm and buttery baking in her kitchen. One visit, she pulled out this pancake casserole instead of flipping individual pancakes for a crowd, and I realized she'd cracked the code to stress-free breakfast. No standing at the stove, no cold pancakes by the time everyone gathered around the table—just one golden pan that fed six people perfectly. I've been making it ever since, especially when I want to impress without the fuss.
I made this for my roommate's birthday brunch last spring, and watching her face light up when she saw the golden-brown casserole come out of the oven was worth every minute. She grabbed seconds before anyone else could finish their first slice, and I knew right then this recipe had become a keeper. Now it's what I reach for whenever I need to feed a crowd without turning my kitchen into a pancake griddle battlefield.
Ingredients
- All-purpose flour (2 cups): Use fresh flour that hasn't been sitting in your pantry for years, as old flour can make the casserole less fluffy.
- Granulated sugar (2 tablespoons): This adds just enough sweetness to balance the salt and lets the maple syrup shine.
- Baking powder (2 teaspoons): This is what gives the casserole its tender, almost cloud-like crumb, so don't skip it.
- Baking soda (1/2 teaspoon): It reacts with the acidic elements and helps everything rise beautifully in the oven.
- Salt (1/2 teaspoon): A tiny pinch that actually makes the maple flavor taste more like itself.
- Large eggs (2): They bind everything together and add richness, so use room-temperature ones if you can.
- Whole milk (2 cups): This creates a tender crumb, though you can swap it for plant-based milk if needed.
- Unsalted butter, melted (1/4 cup, plus extra for greasing): Melt it fully before whisking so it combines smoothly without creating greasy pockets.
- Vanilla extract (1 teaspoon): Just a teaspoon deepens the flavor without making it taste like vanilla cake.
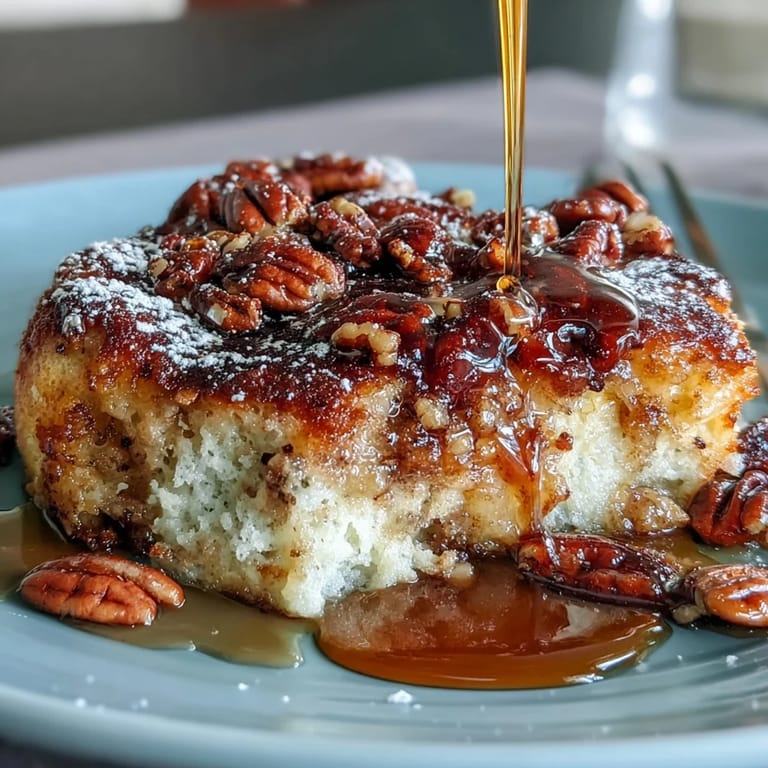
- Pure maple syrup (1/2 cup, plus more for serving): Real maple syrup makes a difference; don't use the imitation stuff for swirling.
- Chopped pecans or walnuts (1/2 cup, optional): Toast them lightly before adding to wake up their flavor and prevent them from tasting bland.
- Powdered sugar (optional): A light dusting at the end makes it feel fancy without any extra effort.
Tired of Takeout? 🥡
Get 10 meals you can make faster than delivery arrives. Seriously.
One email. No spam. Unsubscribe anytime.
Instructions
- Set your stage:
- Preheat the oven to 350°F and grease your 9x13-inch baking dish generously with butter so nothing sticks to the edges. This step takes two minutes but saves you heartbreak when you're trying to serve.
- Blend the dry team:
- Whisk together flour, sugar, baking powder, baking soda, and salt in a large bowl, breaking up any lumps from the baking powder with the back of your whisk. This distributes the leavening evenly so you don't end up with odd volcanic bumps in your casserole.
- Combine the wet ingredients:
- In another bowl, whisk eggs, milk, melted butter, and vanilla until everything looks smooth and cohesive. Make sure there are no streaks of egg white hiding at the bottom.
- Marry them gently:
- Pour the wet mixture into the dry ingredients and stir just until combined—you're looking for a few small lumps still visible, which means you haven't overworked the gluten. Overmixing creates a dense, tough casserole, so resist the urge to beat it into submission.
- Pour and spread:
- Transfer the batter into your greased baking dish, using a spatula to spread it evenly into the corners. This ensures even baking so no corners end up undercooked or overcooked.
- Create the maple swirl:
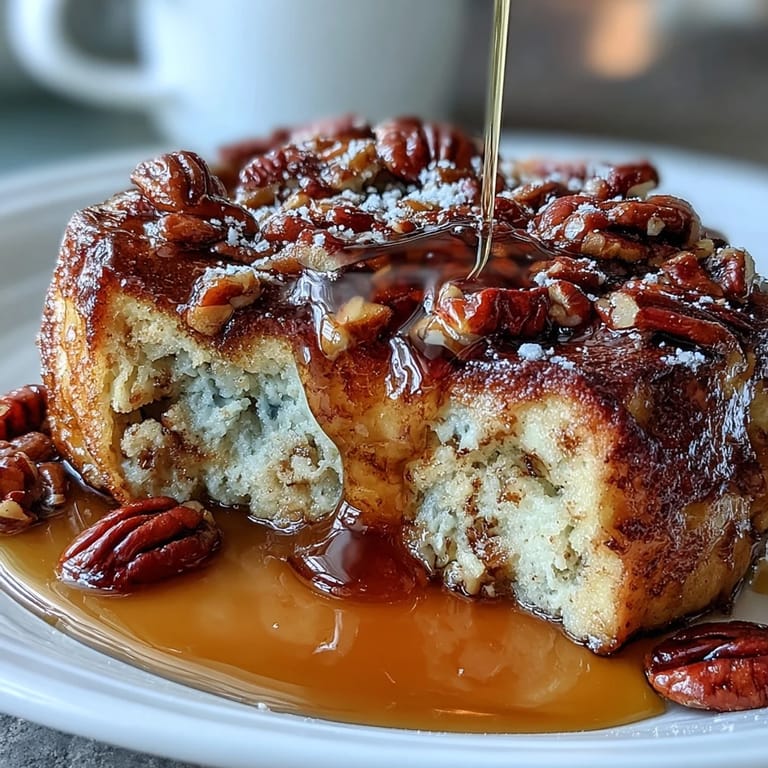
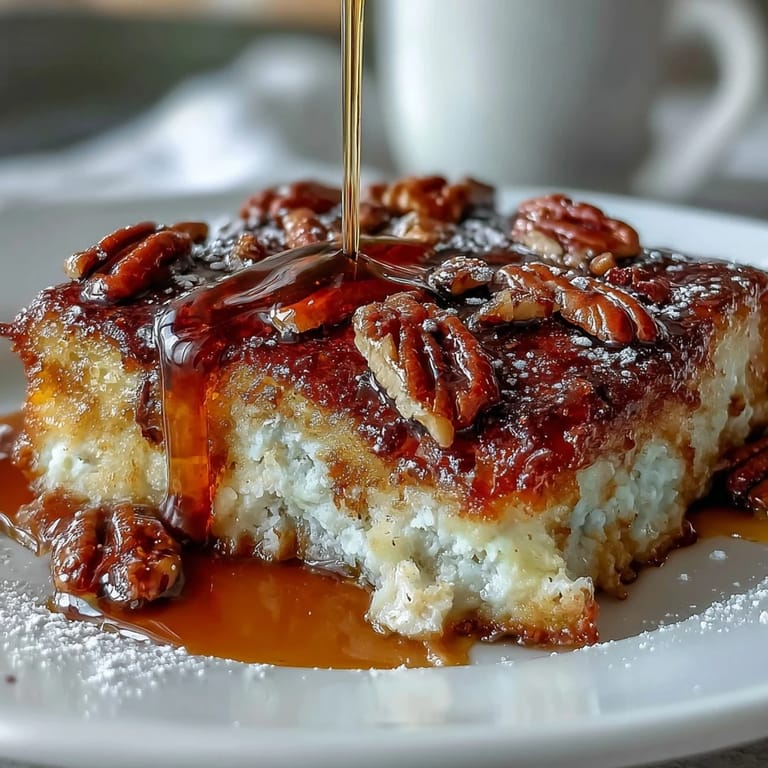
- Drizzle the maple syrup over the batter in a crisscross pattern, then take a knife and gently drag it through in swooping motions to create a marbled effect. The swirls should reach deep enough to flavor the casserole but not so aggressively that you're stirring it into uniform sweetness.
- Optional crunch layer:
- If using nuts, scatter them evenly over the top right before it goes into the oven. They'll toast slightly and add a lovely contrast to the soft crumb.
- Bake until golden:
- Bake for 28–32 minutes, watching for a golden-brown top and inserting a toothpick near the center to check for doneness. The toothpick should come out clean or with just a few moist crumbs clinging to it.
- Cool and finish:
- Let the casserole cool for at least 5 minutes so the structure sets, then dust with powdered sugar and slice into squares. Serve warm with extra maple syrup on the side for those who want to drench theirs.
 Save
Save There's something magical about pulling this casserole out of the oven and watching people gather around the kitchen, drawn in by that maple-and-butter aroma. It's the kind of dish that makes everyone feel cared for without you having spent hours at the stove.
When to Make This
This casserole is perfect for feeding a group when you want to look like you've been cooking all morning without actually having spent that much time in the kitchen. I reach for it on weekends when friends are staying over, during holiday brunches, or whenever I need comfort food that feels a little bit fancy. It's also brilliant for making the night before and reheating—just cover it loosely and warm it at 325°F until heated through.
Variations to Play With
Once you've made this a few times and feel confident with the base, there are so many directions you can take it. I've stirred in mashed bananas for extra moisture, scattered fresh blueberries over the top before baking, and even dropped chocolate chips into the batter for a decadent morning. You could also try swapping some of the milk for buttermilk for a slightly tangy crumb, or drizzle brown butter instead of regular butter for deeper flavor.
Serving Suggestions That Make It Special
Serve this warm with a dollop of whipped cream, a handful of fresh berries, or crispy bacon on the side for contrast. A simple fruit salad alongside keeps things light and bright, and if you're feeling festive, a mimosa or fresh orange juice rounds out the brunch perfectly. The casserole stays good for leftovers too—just store it covered in the fridge and reheat slices gently in the oven or even the toaster oven.
- Top with fresh berries or a drizzle of honey if you want more sweetness without baking it in.
- Pair it with a green salad if you're serving at lunch and want to balance the richness.
- Make it the night before and bake it fresh in the morning for zero stress hosting.
 Save
Save This pancake casserole has become my go-to when I want to feed people with ease and warmth. It's one of those recipes that never fails and always makes the kitchen smell like home.
Recipe FAQs
- → How do I achieve the marbled maple syrup effect?
After pouring the batter into the baking dish, drizzle maple syrup over the top and gently swirl it with a knife to create a marbled pattern before baking.
- → Can I substitute nuts in this dish?
Yes, chopped pecans or walnuts add texture, but you can omit them or try toasted almonds or hazelnuts if preferred.
- → What is the best way to store leftovers?
Store cooled portions in an airtight container in the refrigerator for up to 3 days. Reheat gently before serving.
- → Are there any suggested flavor additions?
Incorporate fresh blueberries, sliced bananas, or chocolate chips into the batter before baking for extra layers of flavor.
- → Can this dish be made dairy-free?
Yes, substitute milk and butter with plant-based alternatives such as almond milk and vegan butter for a dairy-free version.