 Save
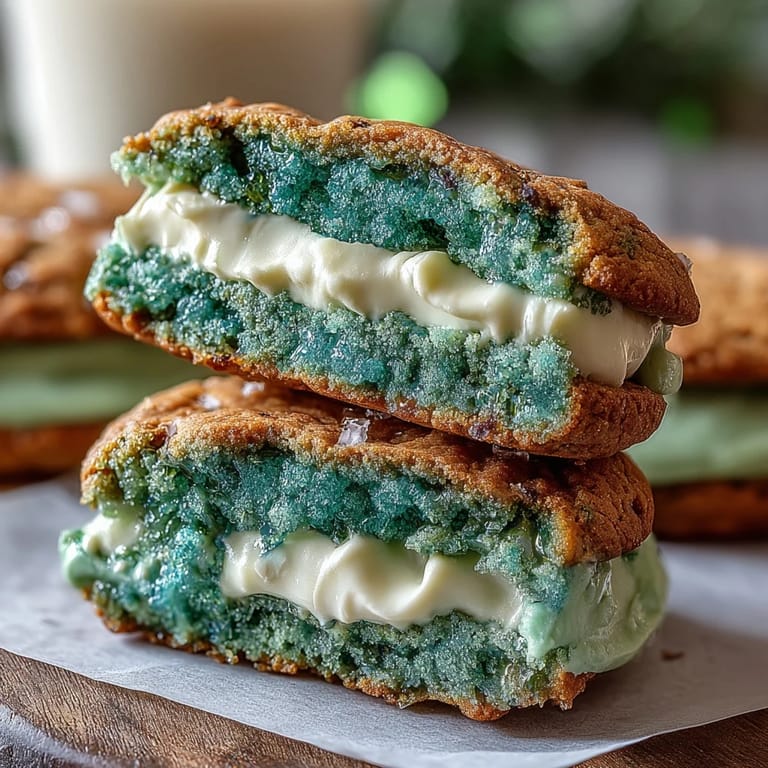
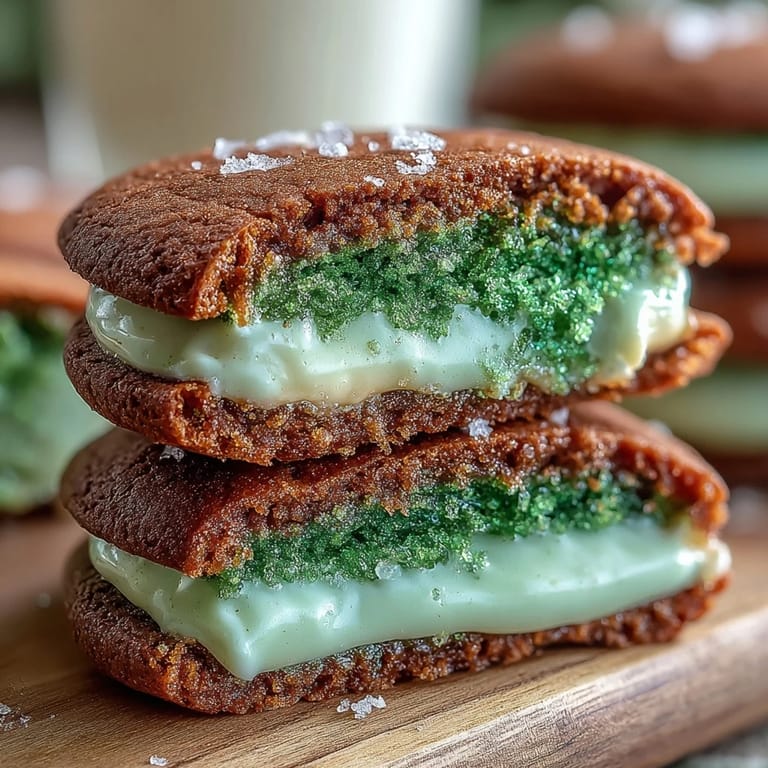
Save My kitchen smells like butter and vanilla on the morning I decide to make these green cookies, and there's something about the combination that instantly puts me in a festive mood. I wasn't even planning a St. Patrick's Day celebration, but when my neighbor mentioned she was hosting a small gathering, I knew exactly what had to happen. These sparkly green sandwich cookies felt like the perfect excuse to dust off my piping bag and spend a couple hours doing something purely joyful with my hands.
I'll never forget my neighbor's face when she bit into one of these at her kitchen table, the way her eyes lit up at the combination of flavors and textures. She kept reaching for another, even though she claimed she was being careful about sweets, and we ended up laughing about how these cookies have a way of making you forget about moderation. It became the moment I realized that feeding people something beautiful and a little bit magical matters more than I'd ever given it credit for.
Ingredients
- All-purpose flour (2 1/2 cups): The foundation of a tender cookie, and measuring it carefully by weight rather than scooping gives you consistent results every single time.
- Baking powder (1/2 tsp): Just enough to give the cookies a gentle lift without making them cakey or too fragile to sandwich together.
- Salt (1/4 tsp): A pinch that seems small but brings out the sweetness and depth of the vanilla and butter.
- Unsalted butter (1 cup): Softened to room temperature so it creams smoothly with sugar, creating that light and fluffy base that makes these cookies melt on your tongue.
- Granulated sugar (1 cup): The sweetness that balances the rich butter and provides the structure for proper creaming.
- Large egg (1): Acts as a binder and adds moisture to keep the cookies tender rather than dry.
- Pure vanilla extract (2 tsp): Use pure over imitation for a cleaner, more genuine vanilla flavor that shines through.
- Almond extract (1/2 tsp, optional): A subtle addition that adds a whisper of complexity without overpowering the vanilla.
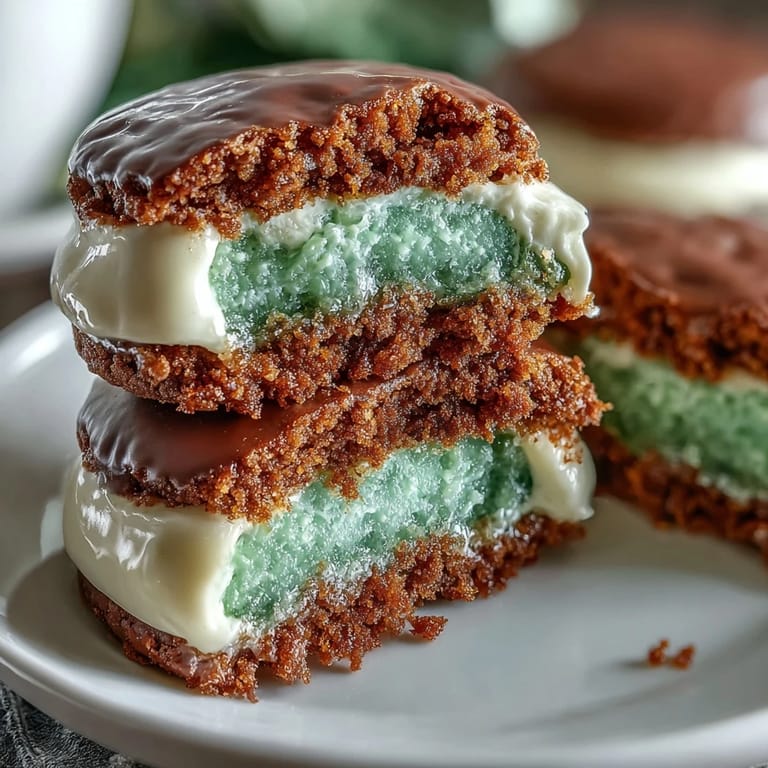
- Green gel food coloring: The gel version keeps your dough thick and vibrant without diluting it like liquid coloring would, and the green stays brilliant even after baking.
- Green sparkling sugar (1/2 cup): This is where the magic happens, creating that festive sparkle that catches the light and makes the cookies feel special.
- Unsalted butter for frosting (1/2 cup): Softened and beaten until creamy, this becomes the smooth base for a frosting that pipes beautifully.
- Powdered sugar (1 3/4 cups): Sifted before mixing to eliminate lumps and ensure a silky frosting without any graininess.
- Milk (1 1/2 tbsp): Adds creaminess and the right consistency for piping or spreading without making the frosting too stiff.
- Vanilla extract for frosting (1 tsp): Echoes the cookie flavor and ties the whole sandwich together.
- Salt pinch: Keeps the frosting from tasting cloyingly sweet and adds balance.
Tired of Takeout? 🥡
Get 10 meals you can make faster than delivery arrives. Seriously.
One email. No spam. Unsubscribe anytime.
Instructions
- Prepare your workspace:
- Preheat the oven to 350°F and line your baking sheets with parchment paper so the cookies slide right off when they're done. This takes two minutes but prevents the bottom edges from browning too much and makes cleanup effortless.
- Mix the dry ingredients:
- Whisk flour, baking powder, and salt together in a medium bowl, making sure the baking powder is evenly distributed throughout the flour. Set this aside and resist the urge to mix it with the wet ingredients just yet.
- Cream butter and sugar:
- In a large bowl, beat the softened butter and granulated sugar together for about 2 to 3 minutes until the mixture is noticeably lighter in color and fluffy like clouds. This step is where air gets incorporated, and you'll actually see and feel the difference when you scrape down the bowl.
- Add the egg and extracts:
- Beat in your egg, then the vanilla and almond extracts, mixing until everything is well combined and smooth. The mixture should look creamy and slightly thickened.
- Color your dough:
- Add the green gel food coloring a few drops at a time, beating after each addition until you reach the shade of green you love. Gel coloring is forgiving and allows you to build the color gradually, which feels more controlled than dumping in liquid coloring all at once.
- Combine wet and dry:
- Add the dry mixture to the wet mixture in two or three additions, mixing gently until a soft dough comes together. Stop as soon as you don't see any dry flour, since overmixing toughens cookies.
- Prepare cookies for baking:
- Scoop out tablespoon-sized portions of dough and roll them into smooth balls, then roll each one in the green sparkling sugar until they're coated on all sides. The sugar sticks better to slightly damp dough, so don't worry if it seems to adhere generously.
- Shape and space:
- Place the sugar-coated balls on your prepared baking sheets about 2 inches apart, then gently flatten each one with the palm of your hand to about 1/4-inch thickness. The gentle flattening helps them bake evenly without spreading too much.
- Bake to perfection:
- Bake for 9 to 11 minutes, watching for the moment when the edges are set but the centers still look slightly underdone. They'll continue cooking on the warm baking sheet after you pull them out, and this is the secret to keeping them soft inside.
- Cool completely:
- Transfer the cookies to a wire rack and let them cool all the way through before frosting, which usually takes about 30 minutes. This prevents the frosting from melting into a puddle.
- Make the frosting:
- In a medium bowl, beat the softened butter until it's creamy and pale, then add the sifted powdered sugar in batches along with the milk, vanilla, and salt. Beat until the frosting is smooth, fluffy, and spreadable, about 2 minutes total.
- Assemble your sandwiches:
- Spread or pipe a generous layer of frosting onto the flat side of half your cookies, then top each with another cookie, flat side down, pressing gently so the frosting spreads to the edges. If you're feeling extra festive, roll the frosting-exposed sides in more sparkling sugar for a full sparkle effect.
 Save
Save There's a magic that happens when you pull a batch of these cookies from the oven and the kitchen fills with that warm, buttery vanilla aroma mixed with the faint sparkle of something festive. In that moment, before the frosting even happens, you already know you've made something worth celebrating.
Why Gel Food Coloring Changes Everything
I used to think gel and liquid coloring were interchangeable, but one batch taught me otherwise when my dough went from perfectly thick to almost sticky after I added liquid green coloring. The gel version means no extra moisture, no adjusting flour amounts, and a green that stays bright and true in the oven instead of fading to a disappointing gray-green. It's a small detail that makes a noticeable difference in both the baking process and the final appearance.
The Art of Not Overbaking
Every single time I've tried to bake these cookies until they look completely done on top, they've ended up slightly too firm, losing that tender quality that makes them special. The trick is trusting your instincts and pulling them out when the edges are set but the centers still look slightly soft and puffy, because the residual heat of the baking sheet does the rest of the work. It sounds counterintuitive, but it's the difference between good cookies and cookies that make people close their eyes when they bite into them.
Storing and Serving Your Sparkly Creations
These sandwich cookies keep beautifully in an airtight container at room temperature for up to three days, and they're just as delicious on day three as they are fresh from the cooling rack. The frosting sets enough to handle without smudging, and the cookies themselves stay soft and flavorful throughout. If you're making them ahead for a party, assemble them no more than a day in advance so the frosting stays fresh and the sparkle remains pristine.
- Keep them in a single layer or separated by parchment paper so they don't stick to each other or lose their sparkle.
- Bring them to room temperature before serving if you've stored them in a cool spot, so the flavors and texture come through clearly.
- Consider making an extra batch because they disappear faster than you'd expect, especially once people realize how delicious they are.
 Save
Save Making these cookies is less about following instructions perfectly and more about enjoying the quiet pleasure of creating something beautiful with your own hands. They're proof that sometimes the most meaningful celebrations happen in kitchens with butter under your fingernails and a little green sparkle on everything.
Recipe FAQs
- → How do I achieve the vibrant green color?
Use gel food coloring for a strong, vivid green without adding extra liquid that can affect dough texture.
- → Can I make these cookies dairy-free?
Substitute butter with a dairy-free alternative and ensure frosting ingredients are dairy-free for a suitable variation.
- → What is the best way to store the cookies?
Keep them in an airtight container at room temperature to maintain freshness for up to three days.
- → Can peppermint extract be added?
Yes, a few drops of peppermint extract can enhance flavor with a festive twist.
- → How can I get the sugar coating to stick?
Roll the dough balls in sparkling sugar before baking and again on the frosting edges for a glittery finish.